One nice quiet, relaxing Sunday morning, our neighbors came over and asked, "Did you just take shower?" What?? Turns out their bathroom just flooded, and they hadn't used that bathroom yet...however, we just showered in ours. We recently noticed our baseboards looked a little moist after showers, but just thought it was from the moisture in the air, like any bathroom with little circulation. Now that we think about it, uh oh! So, the next morning we called out a plumber to find the culprit.
Turns out that in our shower, when the tab on the nozzle that inacts the showerhead is up, the water goes straight up to the shower head. When it is down, it is supposed to go into the tub. BUT, only half was going into the tub....half was shooting out into the wall. AAARRRGGHHH!!
So, not only did the plumber have to rip out our entire shower wall unit, but ALL the walls need to be ripped out so that the "water restoration" (aka mold guys) can come in and industrially dry it out to prevent any mold buildup. So, we called our insurance to file a claim...that's what it is for, right? So, as the bills rack up on all the things we need to have done/do, we decided that we can do 99% of this all ourselves. So, the project begins.......
Since they ripped up all our carpet in the vanity area, and we would have to replace it with something, we decided to put all new tile down in both the bath & vanity area. Which meant that we needed to take up the old tile in the bath area. Luckily it wasn't very much! Vince got all the tile itself up really easily, however when it came to getting up the old mortar, not so easy.
Oh yeah....our toilet ended up in the tub. The mold guys wanted to rip up the tub, but they would have had to take the whole door wall down to get it out...so we said NO WAY.
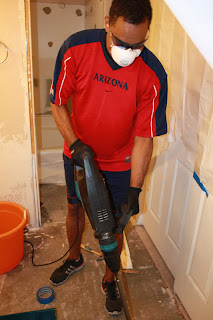
In order to get the old mortar stuff up, Vince went to Home Depot and rented this wonderfull jack hammer/scraper thingy. It was huge, and heavy and SO VERY LOUD! It was crazy....but worked really really well. He loved it! So much that he wanted to start tearing up all the tile in the house!!! No, let's stick to one project at a time!!
OK, it wasn't so huge, but it was heavy...and REALLY LOUD!
One of the wonderful things about our home is all the amazing cracks in our foundation. I swear it looks like we were built on the San Andreas or something. Now we have cracked tiles all over the house from the foundation shifting and cracking...which has completely ruined the tile currently there (even though it wasn't too pretty to begin with). So our big concern was how to seal these cracks to ensure it wouldn't crack the new tiles. Red Guard! This great hot pink stuff that dries bright red/pink. It stays slightly gummy and creates a membrane that allows for some continued movement in the floor, without cracking your flooring above (supposedly). No, we aren't contractors, we just spent 24/7 at Home Depot!!! :) Anyways, problem solved...we think. Either way it was pretty cool. So Vince laid that down....then another 24-48 hours to dry before we can mortar & tile.
Now for the tile....we bought a tile cutter...YEAH!! Vince perfected the cutting, and the mortar spreading, and the laying of the tile. It came out really really good!! I did the grout work, but alas, there are no pictures of me working. Yes, I did help out a lot too...there just isn't any proof....have to trust me! Back to the tile....we think it came out amazing for first timers!!
Oh, so Red Guard is also meant for waterproofing!! They suggest you spread it on your shower walls before finishing so that you get that extra layer of waterproofing. Nice huh? So we Red Guarded all our shower walls.
Also, as you can see, we started the tile work on the shower walls. We used little 2x2 tiles that came in 12x12 sheets. Again, Vince did the laying of the tile & the cutting and I did the grout work. With 2x2 tiles, there was a LOT of grout. No fun.
Back to the finished floor tile....pre-grouting though.
In the vanity area, we already had these lights, but took down that big plain mirror, and repained all the walls a more brown/tan color. We also got a beautiful mirror that we installed.
OK, now on to our cabinet drama!! So we REALLY wanted taller cabinets instead of the standard bathroom cabinets. I searched everywhere for them, and was having trouble finding tall cabinets anywhere. All the home stores had were the regular height ones. So, eventually we went to a specialty cabinet store....and they told us that the people who have the taller bathroom cabinets that we idolize, are really just kitchen cabinets! What!? He said cabinets are cabinets. If you want tall ones, buy kitchen ones! Haha...oh. So, back to Home Depot....and we found the perfect ones in the perfect color. We went home and googled how to install them, and BAM, we were pro cabniet installers!! Haha!!!
We bought a gorgeous countertop.....new sinks...new faucets...new hardware fixtures. DONE. Easy as pie. Haha, ok not really....but we did it...and we did it ourselves (with the help and great advice from some Home Depot guys!). Vince did most of the work and did a GREAT job on all the details and figuring out how to do everything.
Ahhhh....bathroom remodel success!!! Not exactly what we planned to do for 2 weeks, and not necessarily our preferred remodel project...but HEY! DONE and VERY HAPPY with it!


No comments:
Post a Comment